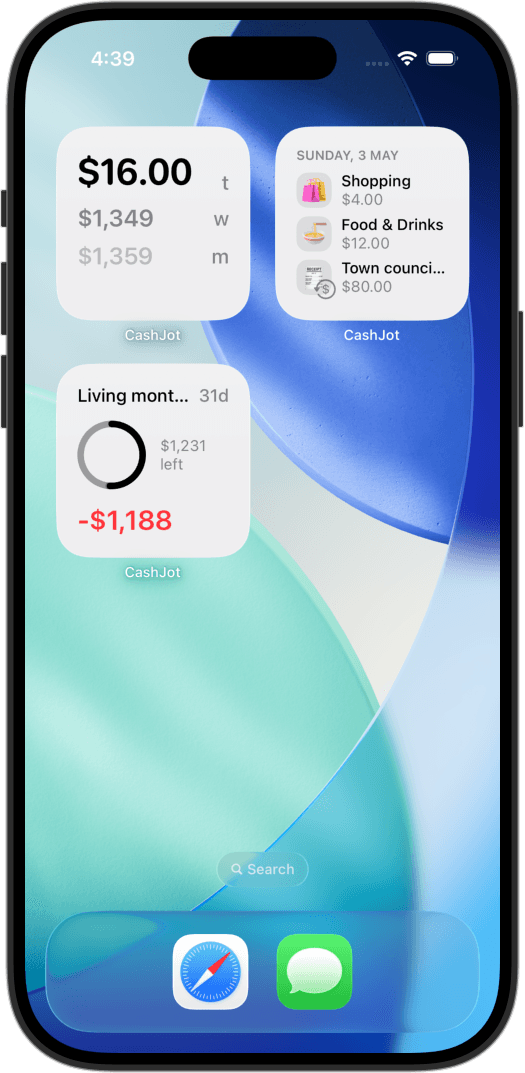
iPhoneでApple Payの支出を自動記録する方法
「ショートカット」アプリのWalletオートメーションを一度設定すれば、店頭でのApple Payタッチ決済が端末内でそのままCashJotに自動記録されます。銀行口座のログインは不要。オンライン購入や現金決済は、これまでどおり2秒のサッと手入力で完結します。
更新日
目次
- Walletオートメーションの仕組み
- 設定後にできるようになること
- 必要なもの
- オートメーションを設定する
- iOS 27以降
- iOS 17〜26
- 通貨の設定
- 何が自動記録されるか(対象となる決済)
- 支出グループの割り当てとカテゴリ
- トラブルシューティング
- オンライン注文やアプリ内決済が記録されない
- 銀行・カード会社の通知の遅れ
- 新しいカードを追加したとき
- サブスクリプションの状態
- 店舗エイリアスで加盟店名を整える
- 特定の店舗・決済を除外する
- 交通機関の改札タッチ(エラーを防ぐ設定)
- 通貨が未登録の場合の対処
- 多通貨のトラベルカード
- 決済端末の重複信号
- 見逃した通知の確認方法
- よくある質問
- iPhoneでApple Payの支払いを自動で記録できますか?
- オンラインバンキングのログイン情報は必要ですか?
- タッチしたのにCashJotに記録されなかったのはなぜですか?
- オンラインでのApple Pay決済も自動記録されますか?
- Apple Pay自動記録は無料プランに含まれますか?
- 店頭でのタッチ決済以外の支出(現金やWeb決済など)はどう記録しますか?
すべての処理はiPhoneの端末内で行われ、外部の金融アグリゲーターを経由することはありません。この記事では、数分で完了する設定手順、カードごとのルール分け、トラブルシューティングを詳しく解説します。
Walletオートメーションの仕組み#
Walletオートメーションは、Appleの「ショートカット」アプリにある個人用オートメーション機能の一つで、iOS 17以降で利用できます。iOS 27ではオートメーションがショートカットの一部になったため、CashJotが設定済みのオートメーションをそのまま共有できるようになりました。Apple Walletで決済が処理された瞬間をトリガーとして動作します。店頭でタッチ決済が完了した直後に、iOSが設定済みのショートカットを実行し、支払いの詳細(金額、店舗名、カード情報)をCashJotのタッチ決済をキャプチャアクションに直接渡します。
すべての処理はiPhoneの端末内で行われるため、銀行の認証情報が外部に送信されることはなく、金融アグリゲーターが利用データを保管することもありません。
ただし、対象となる決済には制限があります。Walletオートメーションが起動するのは、物理的な決済端末でのNFCタッチ決済のみです(詳しくは何が自動記録されるかを参照)。それ以外の支払い(オンライン注文や現金決済など)は手動で記録する必要があります。CashJotを開けばそのままキーパッドが表示されるため、金額を入力してカテゴリタグを選び、保存するだけのわずか2秒でサッと記録できます。
設定後にできるようになること#
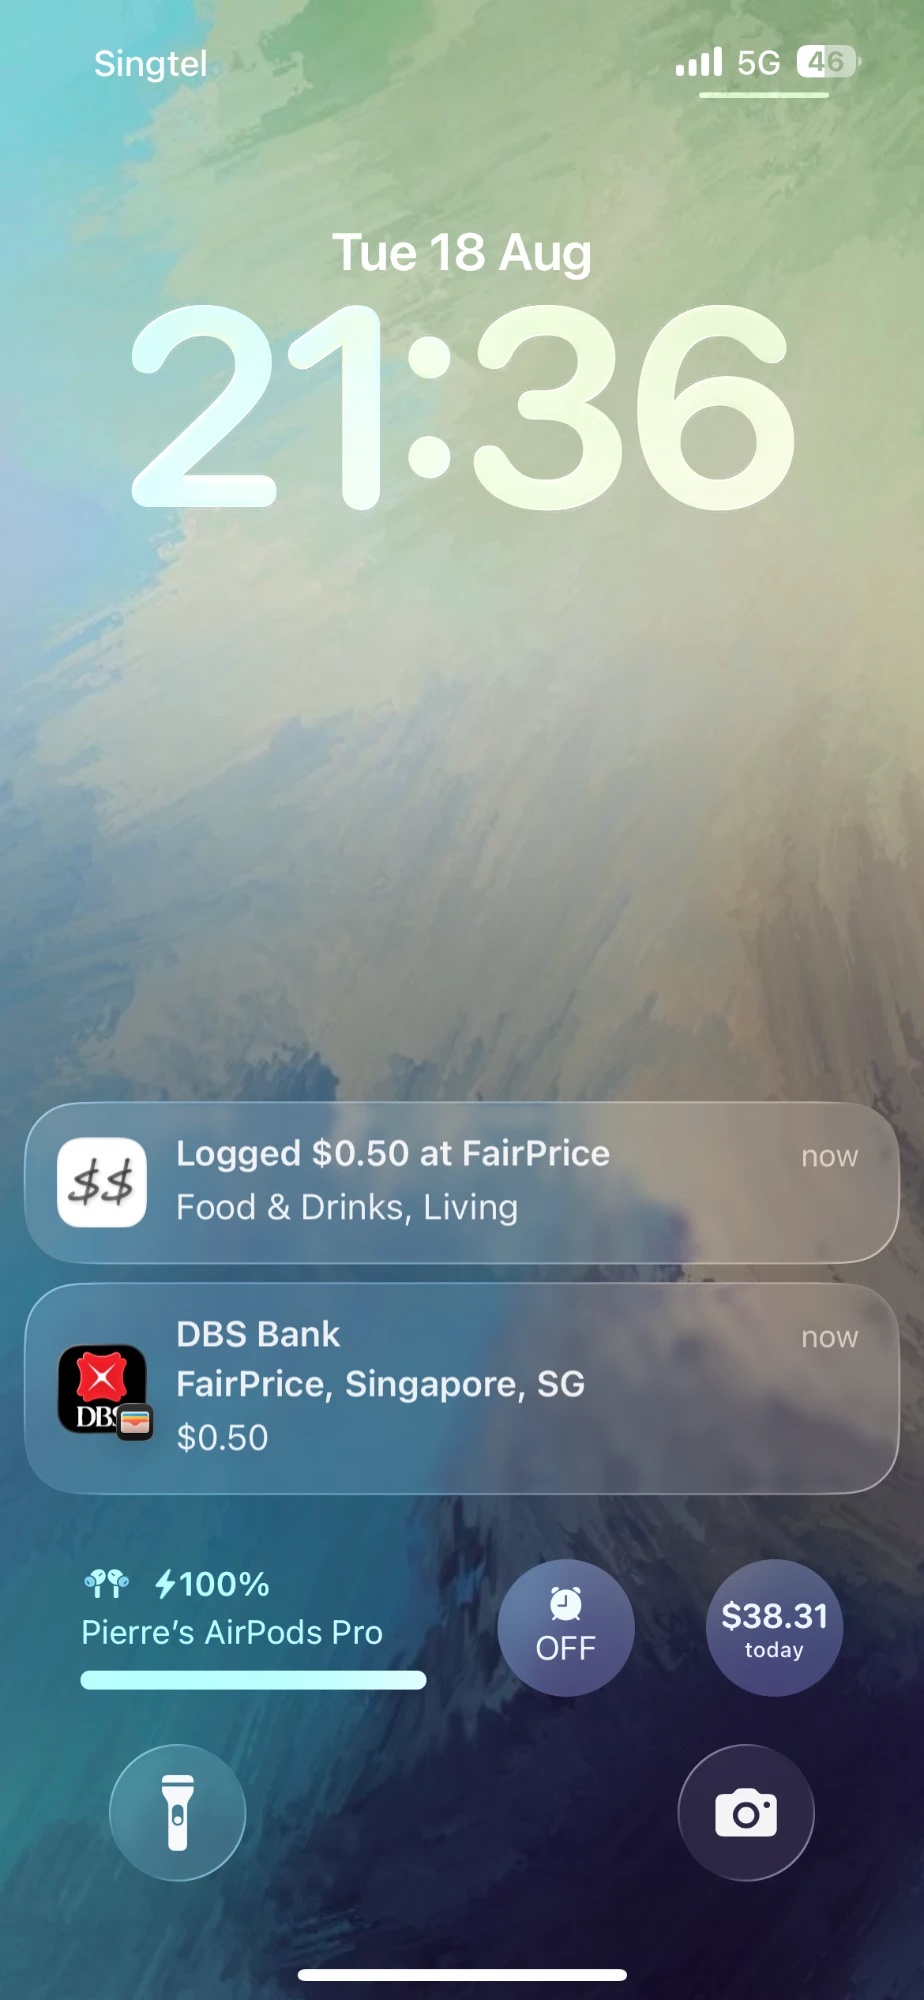
設定が完了すると、店頭でApple Payをタッチ決済するたびに、数秒以内にCashJotの記録画面へ自動反映されます。
画面に確認通知が表示され、タップすると記録された詳細を確認でき、長押しすればその場ですぐに取り消すことも可能です。確認が必要な取引(未登録の外貨や事前承認枠など)は、「キャプチャ」画面で手動確認を待つ状態になります。
必要なもの#
オートメーションを設定する前に、以下が準備されていることを確認してください:
- iOS 17以降を搭載したiPhone
- CashJotがインストールされ、CashJot Plusの登録が有効であること
- CashJotの設定でApple Pay自動記録がオンになっていること(設定 → Apple Pay自動記録)
- Apple Walletに1枚以上の支払い用カード(クレジットカードまたはデビットカード)が登録されていること
オートメーションを設定する#
設定方法はiOSのバージョンによって異なります。iOS 27以降は、用意されたショートカットを追加してオンにするだけです。iOS 17〜26では、「ショートカット」アプリでオートメーションを自分で作成します。バージョンは設定 → 一般 → 情報で確認できます。
iOS 27以降#
1. CashJotのショートカットを追加
CashJotの設定 → Apple Pay自動記録 → ショートカットを設定を開き、ショートカットを追加をタップします。iOS 27以降のiPhoneでこのページを見ている場合は、ここからショートカットを追加することもできます。iOS 26以前ではオートメーションなしのショートカットだけが追加されるため、iOS 17〜26の手順に沿って設定してください。
「ショートカット」アプリにCapture Tap-to-Payが表示されたら、ショートカットを追加をタップします。
2. オートメーションをオンにする
追加されたオートメーションは最初はオフです。ライブラリに戻ってオートメーションを開き、Walletのオートメーションをオンにします。
これで設定は完了です。次に店頭でApple Payを使うと、自動でCashJotに記録され、通知で確認できます。
任意:カードとカテゴリを選ぶ
初期状態では、すべてのカードと、交通機関以外のすべてのカテゴリで実行されるため、改札のタッチは最初から対象外です。対象を絞り込むには:
- オートメーションを長押しし、ショートカットを編集をタップします。
- カードの欄をタップして、対象のカードを選択します。
- トリガーの矢印をタップしてカテゴリを開き、対象のカテゴリを選びます。交通機関はチェックを外したままにします。
iOS 17〜26#
1. 「ショートカット」アプリを開き、オートメーションタブへ
Appleのショートカットアプリを開き、画面下部のオートメーションタブをタップします。
2. 新しいWalletオートメーションを追加
新規オートメーション(または右上の**+ボタン)をタップし、トリガーの一覧からウォレット**を選択します。
3. カードを選び、「すぐに実行」に設定
タップ時で、CashJotに自動記録させたいカードを選択します。カテゴリで交通機関のチェックを外し、改札でのタッチ時にエラーが出ないようにします(詳細は下の交通機関の改札タッチを参照)。加盟店で絞り込むは空のままにしておきます。画面下部ですぐに実行を選択し、確認ダイアログなしでバックグラウンド実行されるようにしてから、次へをタップします。
4. CashJotのアクションを追加
新規ショートカットを作成をタップします。下部の検索欄に「CashJot」と入力してアプリを選択し、タッチ決済をキャプチャ(英語環境ではCapture Tap-to-Pay)をタップします。
5. ショートカットの変数を割り当てる
このアクションにはメインのフィールドが3つ(金額、加盟店、カード)あり、日付と通貨コードは表示を増やすの中にあります。
金額、加盟店、カードのそれぞれについて、次の手順で設定します:
- 対象のフィールドをタップします。
- キーボード上部の変数バーを横にスクロールし、ショートカットの入力をタップします。
- フィールドに入ったショートカットの入力という青いチップをタップして、プロパティ一覧を開きます。
- 対応する項目を選択します。金額フィールドには金額、加盟店フィールドには加盟店、カードフィールドにはカードまたはパスを選びます。
表示を増やすの中にある項目は空のままで構いません:
- 日付: CashJotがタッチした日時を自動記録します。現在の日付を手動で割り当てる必要はありません(すでに設定してある場合も動作上は問題ありません)。
- 通貨コード: 端末の決済データから通貨を自動検出します。検出結果を手動で上書きしたい場合のみ設定してください(下の通貨の設定を参照)。
右上の完了をタップします。これで設定完了です。次に店頭でApple Pay決済を行った際、支払いが自動でCashJotに記録され、プッシュ通知で確認できるようになります。
通貨の設定#
通貨コードを空のままにしておくと、CashJotは決済データに含まれる通貨情報(USD 14.50や¥1,200など)から通貨を自動判別します。通常の国内カードはもちろん、WiseやRevolutなどの多通貨トラベルカードでもそのままスムーズに処理されます。
明示的に通貨コードの上書きが必要になるのは、以下のような特殊なケースに限られます:
- 基準通貨と記号を共有する、別の通貨のカードを使う場合: たとえばアプリの基準通貨がSGDで、米国のUSDカードを使う場合。
$15.00の支払いが明示的な指定がないとSGDと判定されることがあります。通貨コードにUSDを指定すれば解決します。 - 海外発行のカードで、キャプチャの確認トレイに保留されやすい場合: 明示的な通貨コードを指定すると、正しく即座に割り当てられます。
- 基準通貨の異なる複数枚のカードを使い分ける場合: カードごとに別々のオートメーションを作成し、それぞれに対応する通貨コードを指定します。
何が自動記録されるか(対象となる決済)#
Walletオートメーションは、店舗の決済端末にかざして行う物理的なNFCタッチ決済でのみ動作します。
Webサイトでのオンライン決済、アプリ内課金、SafariでのApple Pay支払い、個人間のApple Cash送金などでは起動しません。これらは2秒の手入力フォームでサッと記録してください。
支出グループの割り当てとカテゴリ#
自動記録された支払いは、以下の優先順位に従って支出グループへ割り当てられます:
- カードルール: 特定のカードに対して個別に設定したグループが最優先されます(設定 → Apple Pay自動記録 → カードルール)。
- Apple Payのデフォルトグループ: Apple Pay自動記録専用に設定されたデフォルトの支出グループ(設定 → Apple Pay自動記録 → デフォルトグループ)。
- 選択中のグループ: カードルールもデフォルトグループも未設定の場合は、ログタブで現在開いている支出グループに記録されます。
設定 → Apple Pay自動記録 → カードルールから、特定のカードを専用のグループへ直接振り分ける設定が可能です。たとえば、事業用カードは「副業」グループへ、個人用カードは「日常」グループへ、といった使い分けが自動化できます。
カテゴリは、その店舗での過去の支出履歴に基づいて自動的に提案されます。
トラブルシューティング#
オンライン注文やアプリ内決済が記録されない#
オンライン注文、アプリ内課金、SafariのWebサイトでのApple Pay決済では、Walletオートメーションは起動しません。これらはCashJotを開いて手入力で記録してください。
銀行・カード会社の通知の遅れ#
Walletオートメーションは、カード発行会社がApple Walletへ送信する決済確認シグナルに依存しています。多くの主要カード会社は1〜2秒以内に送信しますが、最大1分ほどかかる会社や、端末への通知に対応していない一部の金融機関もあります。数分経っても記録されない場合は手入力で記録してください。
新しいカードを追加したとき#
すべてのカードを対象にしたオートメーション(iOS 27用ショートカットの初期設定)なら、新しいカードも自動で対象になります。特定のカードを選んだ場合はそのカードでのみ実行されるため、Apple Walletに新しいカードを追加したら、ショートカットのオートメーション設定を開いて新しいカードも対象に追加してください。
サブスクリプションの状態#
Apple Pay自動記録はCashJot Plusの限定機能です。有効期限が切れるとショートカット自体は動作してもCashJotへの自動記録は停止します。設定 → Apple Pay自動記録からいつでもプランを再開できます。
店舗エイリアスで加盟店名を整える#
Apple Payの決済データには、STARBUCKS #10429 AIRPORTのように店舗端末の記号や番号が含まれることがあります。設定 → Apple Pay自動記録 → 店舗エイリアスを使えば、パターンSTARBUCKSに対して表示名をスターバックスのように統一して登録できます。大文字・小文字は区別されず、すべての店舗に適用されます。
特定の店舗・決済を除外する#
記録したくない繰り返しの支払い(交通機関のチャージ端末や、社用経費の決済など)がある場合は、設定 → Apple Pay自動記録 → 除外店舗に登録しておくことで、自動で記録をスキップできます。
交通機関の改札タッチ(エラーを防ぐ設定)#
鉄道やバスなどの交通機関は、改札タッチごとのリアルタイム請求ではなく、1日の運賃をまとめて夜間に一括精算する仕組みが一般的です。改札を通った瞬間にオートメーションが反応すると決済額がまだ確定していないため、一時的な通知エラーが発生することがあります。このエラーを防ぐには、ショートカットのWalletオートメーション設定で交通機関のカテゴリのチェックを外してください。iOS 27用ショートカットは、最初から交通機関のチェックが外れています。
通貨が未登録の場合の対処#
支払いの通貨が対象の支出グループにまだ追加されていない場合、CashJotはその取引を「キャプチャ」トレイに一時保留し、通貨の追加を促します。グループの編集画面で対象の通貨を追加するか、ショートカットのオートメーションで通貨コードを調整してください。
多通貨のトラベルカード#
WiseやRevolutのようなトラベルカードは、現地の店舗の通貨で決済されます。ショートカットの通貨コードを未設定のままにしておけば、CashJotがタッチ時のデータから現地通貨を自動認識するため、特別な設定は不要です。
決済端末の重複信号#
決済端末の不具合などで90秒以内に同一金額・同一店舗のシグナルが複数回送信された場合、CashJotが重複を自動検出し、二重記録を防ぎます。
見逃した通知の確認方法#
キャプチャ通知をうっかり消してしまった場合でも、記録は安全に保存されています。直近のキャプチャ履歴は、ログタブのトレイアイコン、または設定 → Apple Pay自動記録 → キャプチャからいつでも確認できます。
よくある質問#
iPhoneでApple Payの支払いを自動で記録できますか?#
はい、店頭でのタッチ決済であれば可能です。iOS 17以降、Appleの「ショートカット」アプリにある個人用Walletオートメーションを利用して、銀行ログインなしで支払いをCashJotに直接渡すことができます。
オンラインバンキングのログイン情報は必要ですか?#
一切不要です。オートメーションは端末内のApple Walletを起点にローカルで起動します。銀行のIDやパスワード、外部の金融アグリゲーターなどを介することは一切ありません。
タッチしたのにCashJotに記録されなかったのはなぜですか?#
オートメーションは、カード発行会社がApple Walletへ迅速に決済シグナルを送る仕組みに依存しています。カード会社側で端末通知の遅延や停止が発生していると、オートメーションが起動できません。詳しくは上記のトラブルシューティングをご確認ください。
オンラインでのApple Pay決済も自動記録されますか?#
いいえ。iOSのWalletオートメーションは、店頭での物理的なNFCタッチ決済でのみトリガーされます。アプリ内やSafariのWebサイトでの購入は、CashJotのクイック入力フォームからサッと手入力してください。
Apple Pay自動記録は無料プランに含まれますか?#
手入力による支出記録は完全無料で、件数の上限もありません。Apple Payの自動記録機能はCashJot Plusに含まれます。
店頭でのタッチ決済以外の支出(現金やWeb決済など)はどう記録しますか?#
現金払いやオンライン注文などは、CashJotを開いて手動で記録します。アプリを開くとすぐにキーパッドが表示されるため、金額を入力し、カテゴリタグを選んで保存するだけのわずか2秒で完結します。入力補完や1タップのお気に入り機能により、手入力でも一切ストレスを感じさせません(詳細はiPhoneでの支出記録ガイドをご覧ください)。
日々の支出を、もっと身軽に記録
レジ前で2秒でサッと記録。Apple Payの自動記録やウィジェットにも対応。銀行ログイン不要・完全オフラインで安心。